Custom Voicings
The app can generate any voicing by itself for a given chord and instrument. Whereas it’s convenient when you don’t know what you’re looking for, it can be bothersome to find the correct set of parameters to make the app generate a voicing you’re looking for specifically. In this case, you can create a custom chord voicing. This voicing is attached to the chord and the instrument configuration. It will be used preferably over generated voicings when the conditions are met. Please note that custom voicings are independent of generators’ preferences and will appear each time the chord and instrument are matching, whatever the generator preferences are.
Please note that custom voicings content is not checked against the underlying chord: you are free to define a custom voicing with incorrect notes for the chord. For this reason, custom voicings do not participate in reverse chord search.
Editing a custom piano voicing
Editing a custom standard guitar fingering
How to create a new voicing?
To create a custom voicing, go to Settings/Music/Custom Musical Definitions/Custom Chord Voicing. You can then manage your custom voicing, or create new ones. You can also duplicate an existing custom voicing by long-pressing it and selecting “Duplicate” on the menu that appears.
The app seeds the chord with C major and the instrument with your default instrument. You can change the chord and the instrument by tapping the corresponding rows. What happens next depends on the kind of instrument you’re using.
For both kinds of instruments, you can optionally give the voicing a name and add some description by tapping the button. This name is only used for reference and doesn’t affect how the voicing is rendered.
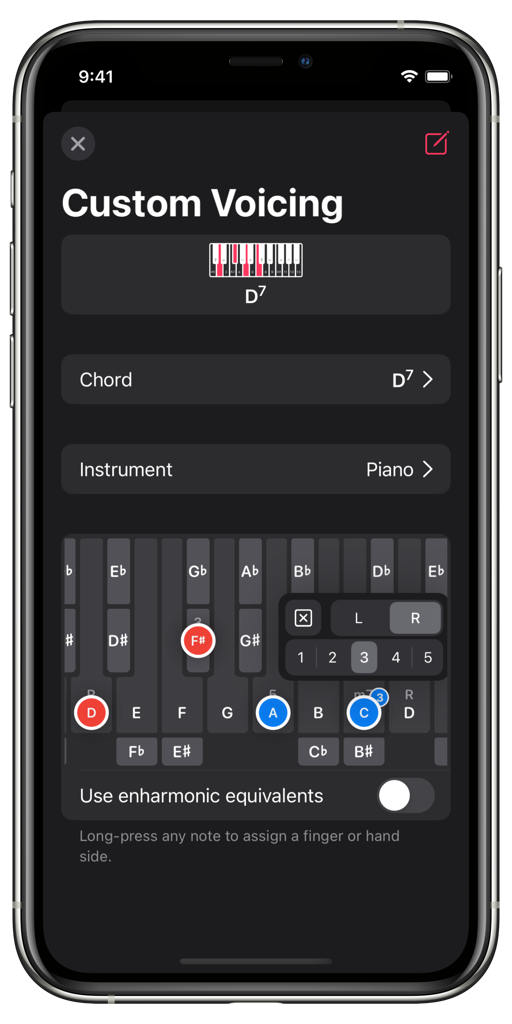
Custom piano voicing
The app displays a piano view at the bottom of the screen. You can opt to use a regular keyboard or a disambiguated keyboard where enharmonic keys are split. This is only for convenience because piano diagrams are drawn using an enharmonic keyboard. Since you’ve selected D7, the app has annotated keys with this chord intervals. You can slide the keyboard horizontally to input voicings on more than one octave.
Piano voicings are possibly formed with two hands and red and blue dots correspond to the left and right hand respectively. You simply enter the notes of the chord by tapping the keys. If you want to specify a finger or change the hand side, long-press the note and select the finger or hand you want. You can reset the finger by tapping the button in the popover.
You can optionally give it a name and add some description by tapping the button. This name is only used for reference and doesn’t affect how the voicing is rendered.
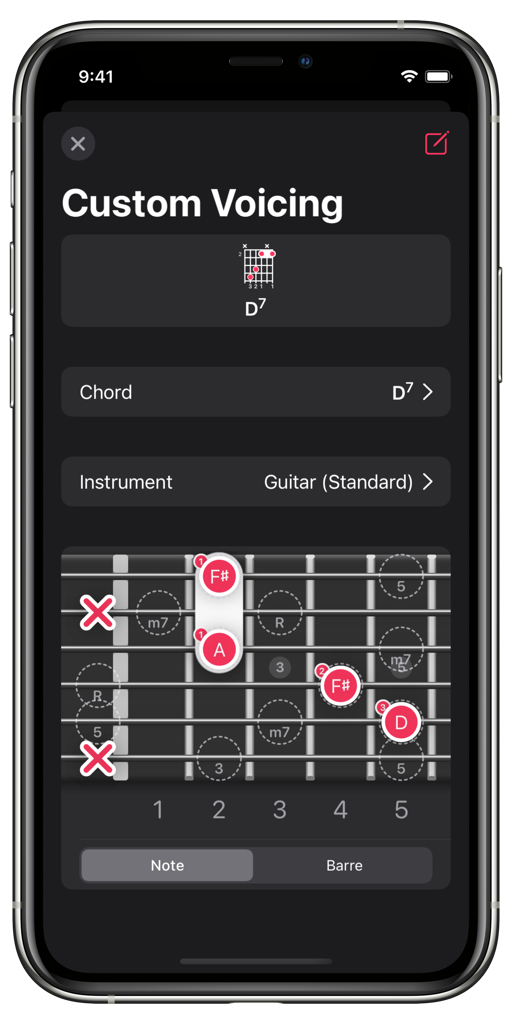
Custom guitar fingering
If you selected a guitar-like instrument, the app presents a neck to input the note and already have marked the intervals or the chord. You can select if you’re specifying notes or barre with the selector at the bottom of the neck.
With the “Note” input mode selected, you enter notes by tapping the correct locations. You can optionally long-press a note to specify the finger to be used. As for pianos, you can reset the finger by tapping the button in the popover.
If your chord fingering has barres, you can select the “Barre” input mode and tap the corresponding frets. Please note that this defines only the barre and not the played notes withing which are defined with the “Note” input mode.