Tutorial
This short tutorial should give you a glance at the app and its main features.
Launching the app
When you launch the app, you should see a document browser view. Like the Files app, you can navigate and select where you want your content to be saved.
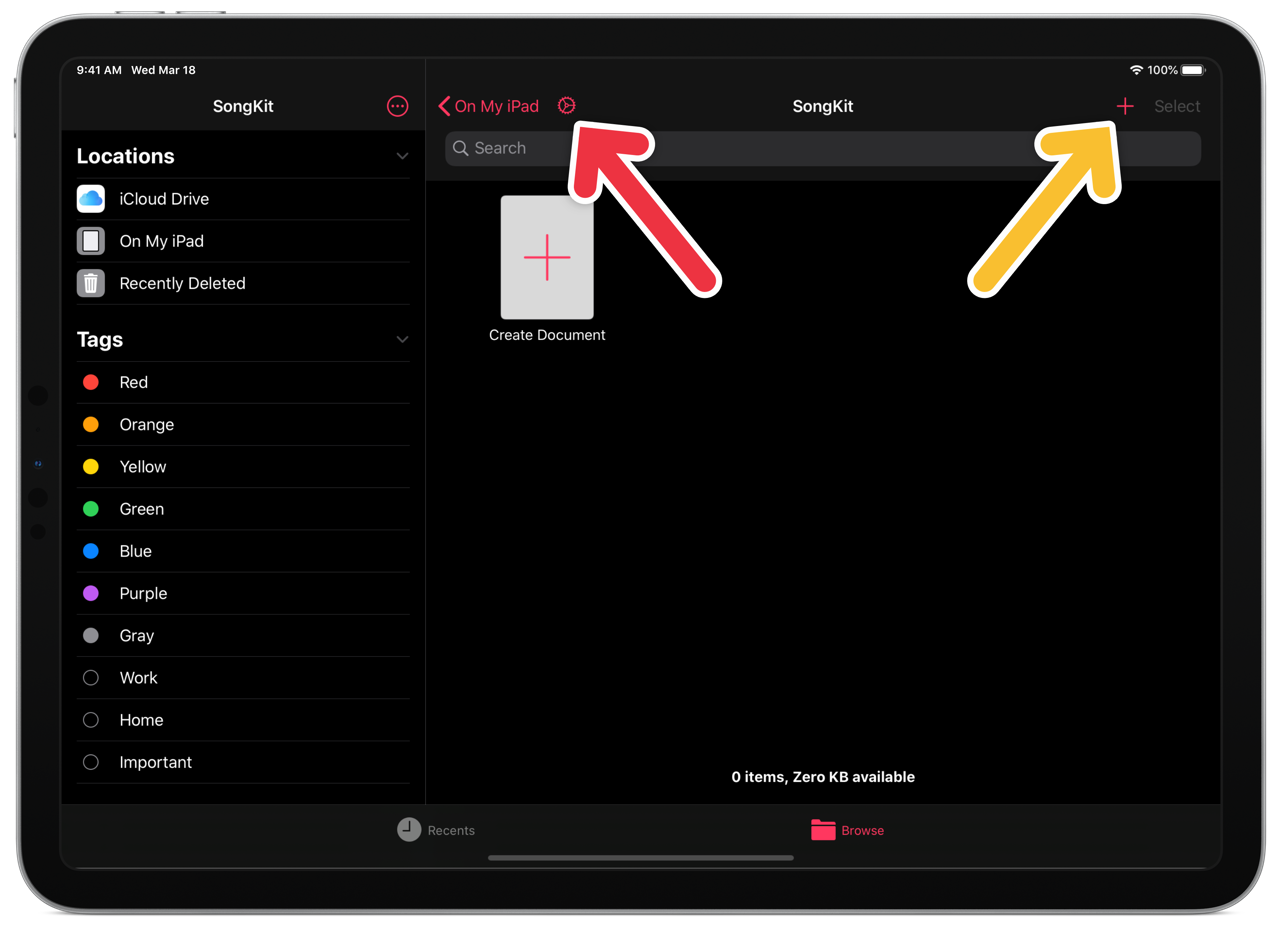
SongKit's Home screen
If you select some cloud backed destination, like iCloud, your songs will be automatically synchronized between your devices.
It is recommended to use the default folder created by the system when the app was installed. The app has indeed full access to this folder and can perform most of the tasks without requiring your input.
You can access the app’s settings with the gear button at the top of the screen. You can create a song with the plus button on the other side.
Creating a song
Tap the plus button or the “Create document” icon. SongKit can store content for several players in the same file. For example, a song can have content for the Lead Guitar and Rythm Guitar, both playing on a 6-strings guitar with standard tuning, and a Piano part, played on a piano by Michel. In this configuration, there will be three voices in the song:
- Lead Guitar with the instrument “Standard Guitar”;
- Rythm Guitar with the instrument “Standard Guitar”;
- Michel with the instrument “Piano”.
There is no limit to the number of voices, but in the majority of cases, a song will only have one voice, named as its instrument.
In the “New Document” screen, tap on the top button to create an empty song with a voice using your default instrument.
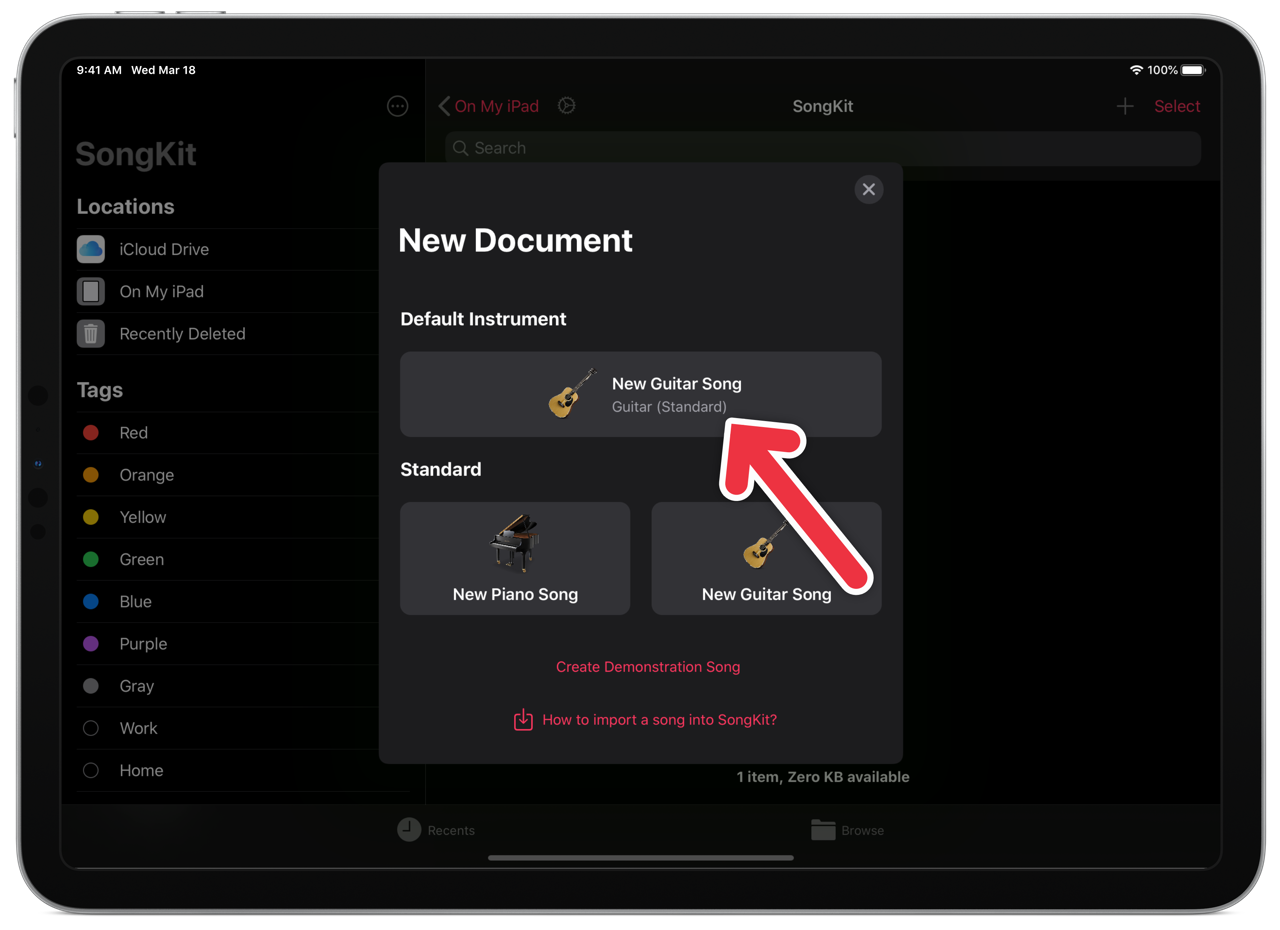
New Document creation screen
Editing a song
You are seeing the song in Edit Mode. In this mode, you should only care for the content of the song. Its presentation is handled in the Display Mode that can be accessed by tapping the “Back” button.
An empty song in edit mode
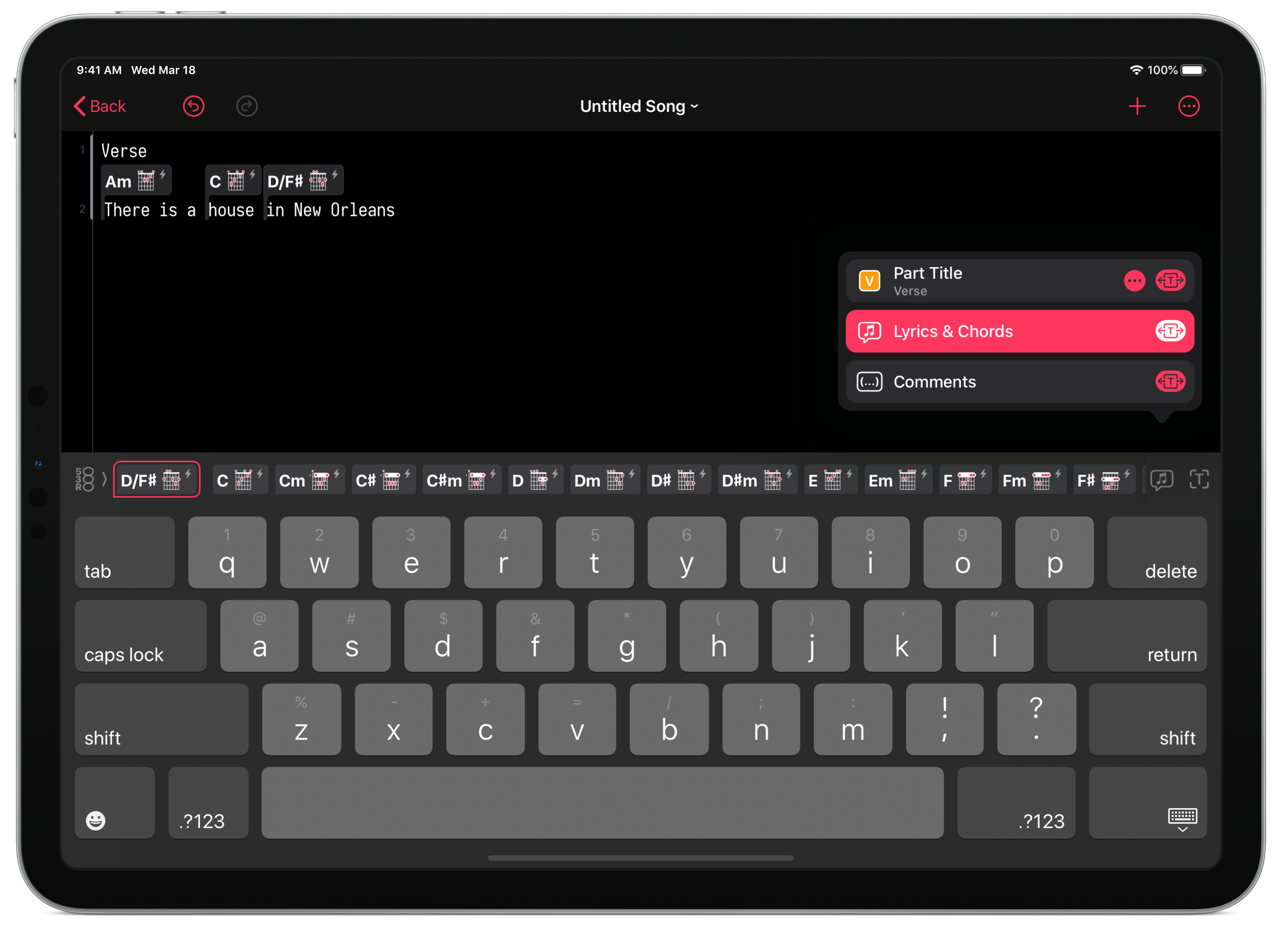
If you don’t see the keyboard, simply tap in the void to make it appear. If you’re using an external keyboard, only the top row of the keyboard in the picture will appear. Using the labels of the image, the buttons of this bar are:
- P- Palette Selection: Tap this button to select the current palette, that is the list of chords that are displayed in area (C);
- S- Staged Annotation: This annotation (most likely a chord) is the chord being built an ready to be inserted into the song
- C- Palette: This is a list of chords or tablature’s bars that can be inserted into the song by tapping on it.
- T- Text Input Selection: Use this button to select the kind of text being inserted: Lyrics, Part titles or Comments.
- F- Text Focus Toggle: Tap this button to switch On or Off the “Text Focus” mode. When activated, chords annotations are collapsed and the lyrics are easier to read and handle.
Lyrics and chords
So we are going to enter some lyrics. Type some text on the keyboard, let’s say “There is a house in New Orleans”. You now want to add chords. You now want to add the chords Am before “There”, D7sus4 before “house” and D/F# before “in”, like this:
Am         D7sus4 D/F#
There is a house  in New Orleans
First, move the cursor before “There”. Fortunately, Am is a very simple chord and is already present in the list of basic chords that is displayed by default above the keyboard. Find the Am annotation in the list and simply tap it to insert the Am chord at the cursor position.
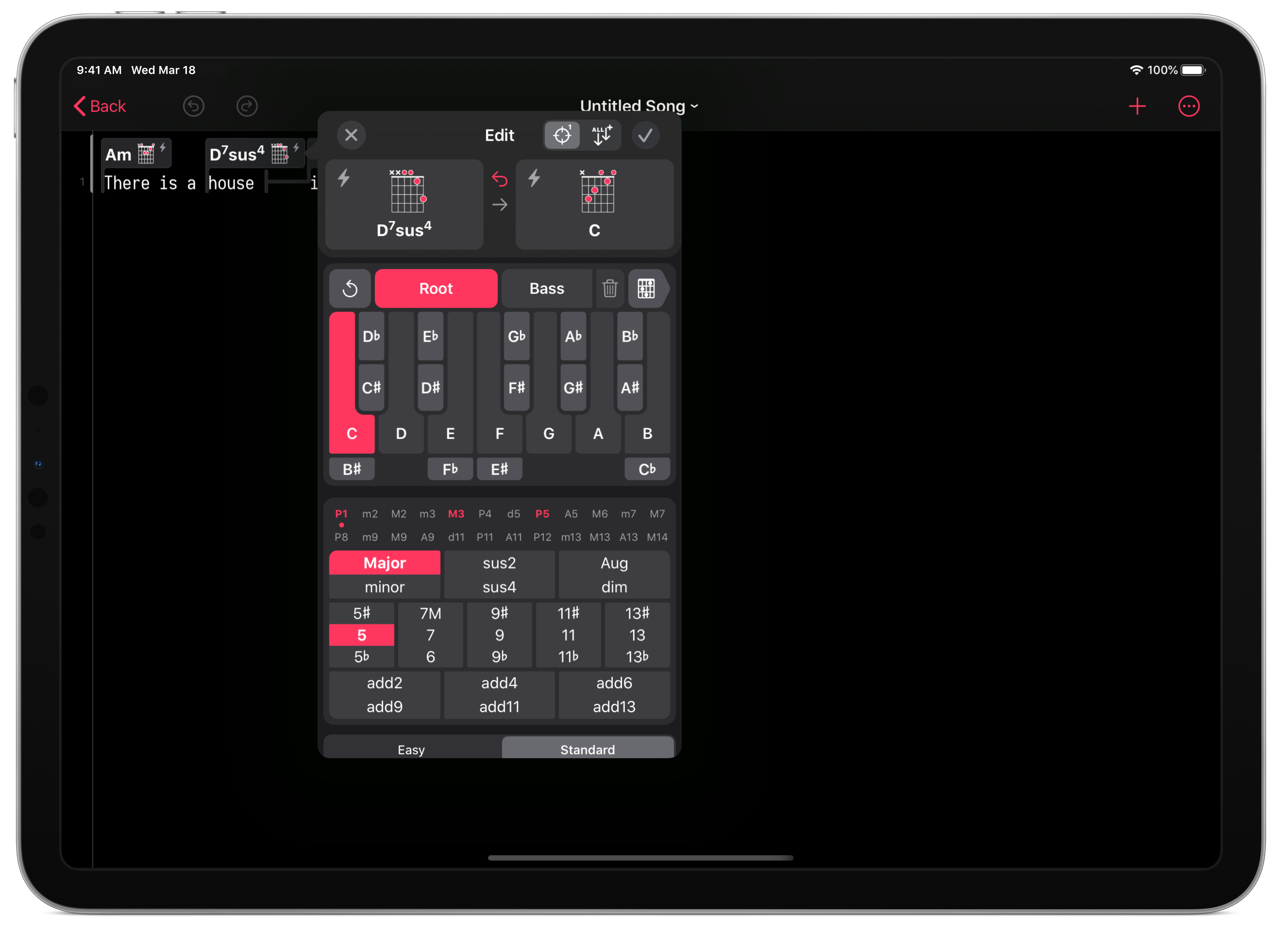
Next, we want to insert D7sus4. This chord is not in the list of simple chords. Tap the button at the top right and select “Chord”. The keyboard will switch to the Chord Input Keyboard. This keyboard allows building a chord step by step. The annotation being prepared is displayed and highlighted above the keyboard, and will be inserted at the cursor position when you tap it. So let’s build D7sus4.
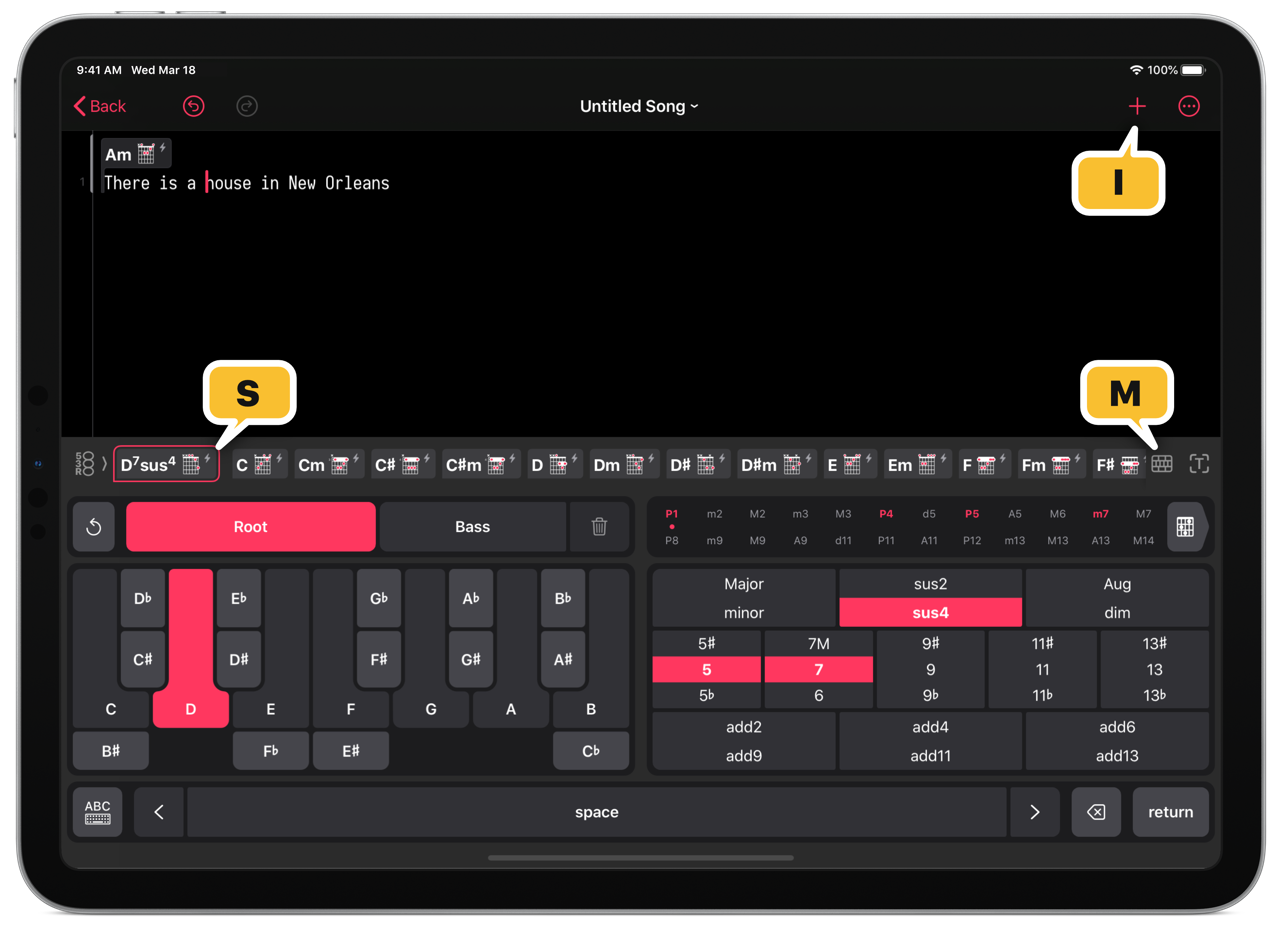
Preparing a chord for insertion
The “Root” button should be highlighted, meaning that we are editing the root of the chord. If it’s not the case, tap on it. Then tap “D”. Now we need to specify the chord structure, which is “7sus4”. On the iPhone, tap again the “Root” button to deselect it and display the view to edit the chord structure. On the iPad, this view is already displayed to the right. There are two modes to input a chord and you can switch between them with former to last button in the row above the keyboard. With the default mode, you simply build the chord intervals by intervals, following its symbol. There is a “7” so tap the “7” button until the middle row is highlighted. Then tap the “sus2, sus4” button until “sus4” is highlighted. You can check your progress with the staged annotation. At this point, it should shows D7sus4. Position the cursor before “house” and tap the annotation to insert it.
It remains only D/F#. Tap the reset button next to the “Root” button to reset the chord. Tap “Root” so it is highlighted, and then tap “D”. Tap the “Bass” button to enter the bass selection button, and then tap “F#". The staged annotation should display D/F#. Position the cursor before “in” (you can use the arrows at the bottom of the keyboard), then tap the staged annotation to insert it. You may have noticed that the app spaced “in” so the chords above do not overlap.
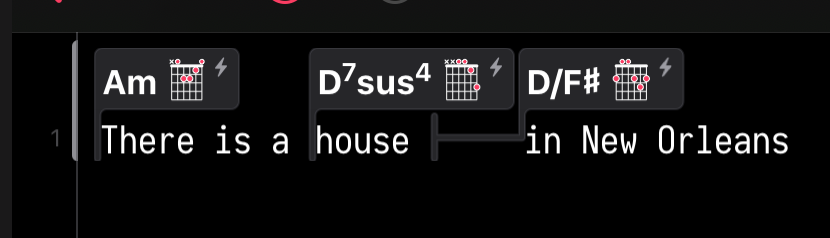
Lyrics with chords in edit mode
We may have made a mistake. The second chord should be a C. Let’s correct this. Tap on D7sus4 annotation. Then change the chord to C. Right now, only this occurrence of D7sus4 will be changed because is selected. If you select , this D7sus4 and all its following occurrences will be modified. Validate the change with the button
Editing an existing chord
Adding a part title
We are now going to put a “Verse” title above the lyrics and chords we have just entered
Make sure that the keyboard is in text mode by tapping the button.
Move the cursor at the very beginning and enter “Verse” and jump one line. Then put the cursor back on the line where “Verse” is. Then tap the “Text Input Selection” button at the right of the keyboard toolbar
Selecting text input
Right now, it says that we’re entering “Lyrics and Chords”. We are going to apply “Verse” to the whole line. Fortunately, the part kind is already “Verse”. We can change it to “Chorus” or “Intro” by tapping the button.
If we tap the “Part Title” row, all the text we are going to enter now will be considered as a verse title. But we have already entered the title for this verse. We can tap the button so the “Verse” part title style will be applied to the whole line where the cursor belongs.
The “Verse” text at the beginning has now turned orange and the following lyrics are automatically included in the verse. We can now go to the display mode by tapping the “Back” button at the top left.
Viewing a song
We are now viewing the song in display mode.
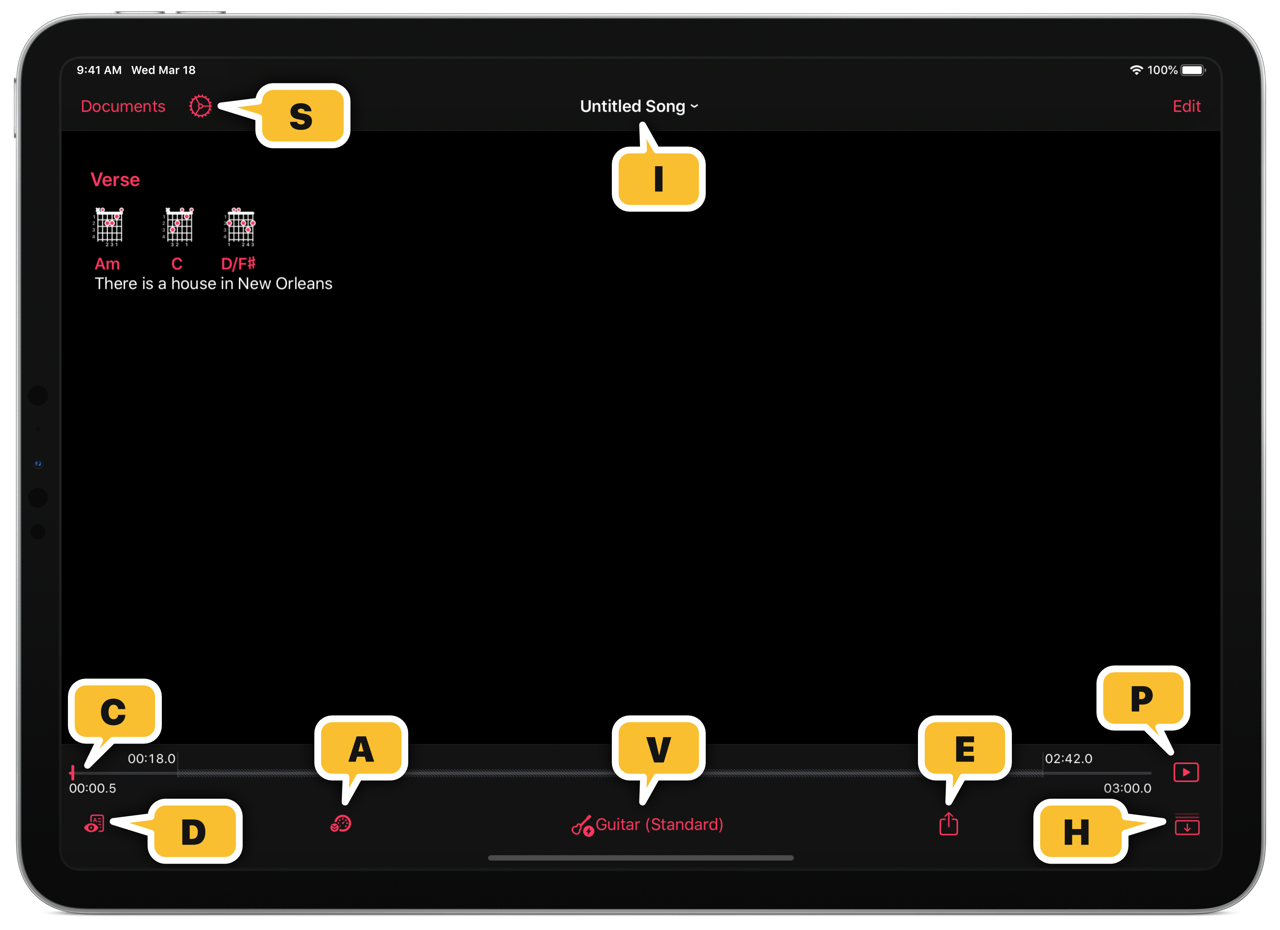
The song in display mode
- S- Settings: Tap to present the settings of the app. They can also be accessed from the first screen of the app;
- I- Song Info: This presents a window where you can enter information about the song (Title, Artist, …) or transpose the song.
- C- Scrubber: You can drag this slider to scrub in the song. The timestamps from left to right are: the current position, the start of scroll timestamp, the end of scroll timestamp, and the song’s duration.
- P- Autoscroll Control: Pressing this button toggles autoscroll on and off.
- H- Hide Toolbars: Tap this button to display the song in fullscreen.
- D- Display: Tap to can change how the song looks. You can show/hide various elements or select a display style.
- A- Autoscroll: Tap to edit autoscrolling parameters like the song’s duration.
- V- Voices: Tap to select another display voice.
- E- Export: Tap to export the song as a PDF file.